Showing posts with label left brain. Show all posts

Thursday, January 27, 2011

46 DTG-Mock Up, Take 2, Continued

Well, things have gotten complicated.  *insert eyeroll here because this is what happens to ALL my projects when left-brain starts taking over*


Now that I'm very closely reading the Vogue directions, I realize piece 8 (Back band) is NOT a flap that lays under the laced up ribbon (like a back guard so my skin wouldn't be showing between the lacings).  It is actually the reinforced piece where I'm supposed to poke the grommets through.  It's partially assembled and then sewn onto the edge of the back to give it a little more stability.  But this means that it adds additional width to the back of the corset.  Where my mom was able to make the sides meet in the back when I tried the top on, they may very well overlap with the addition of these two pieces which will give me no play to pull the lacings tight.  For this "play" I will actually need a 2 inch (or larger) gap between the finished edges of the back.  So...I made them and assembled them onto the mock up.


Folded length-wise, right sides together, stitch across ends, trim seam allowance

Turn right side out. To make a sharp corner I use a knitting needle
or wooden skewer to turn out the ends.


Press, baste across open edges


Pin to outside of each back (piece 6) between large circles, stitch


The large circles I marked on pieces #6 didn't convey in this pic,
so I've accented them. These were transferred from the pattern with a
washable cloth marker when I cut out the pieces.


Press seam in. You can see the large circles drawn
onto the fabric better in these pics.  That protruding edge
is where the grommets will get punched on the finished product.


Once I tried the modified top on and had hubby pin me tightly into it, we realized I have a 2 inch overlap!!  What an ego boost!  He marked where he had pinned me in with pencil so I have guidelines to measure.  The beauty of a mock-up is being able to draw all over the cheap fabric, knowing I won't be actually wearing this working garment.


I've got some room to take in the hip, waist and
even more at the bust (I know!  Shocking that my
bust needs the most taking in)


All of the pattern pieces are cut the same for all sizes except where pieces 4 and 7 meet at the side seam.  So this will be the place I need to take in the garment to get the back seams to gap for the lacings.


The various dotted lines are the places to cut for different sizes.

The marks DH made on the back indicate I could do with 2 inches off, but I'm going to sew in the seam one size at a time and keep trying it on.


To Do List

  • Mock up, take 3
  • Whatever the last To Do List said since I got side-tracked from it today *insert grimace face here*

Monday, January 24, 2011

On the Business End

Just a quick note to clear up a possible confusion.


My count down for my current project doesn't match up with the dates of my posts.  For example, I'll be posting later tonight on 48 Days to Go, but today's countdown clearly says I'm down to only 46 days.


I write as I work on the project.  But when I close down the sewing machine for the night, I don't automatically post.  Usually, I need to download pictures from my cameras or find a link and make a final read through to edit.  So I like to do all that with a fresh mind when I first sync up my phone (with the pics) in the mornings.  So I sit on a semi-finished post for a few days.  By the time I put on the finishing touches and hit the Publish Post button, it'll be a day or several after I've done what I talk about in the blog (and therefore several days off from the countdown).  Don't worry, I'm well aware of that countdown ticking away!

Tuesday, January 18, 2011

53 DTG-The Great Lining Debacle

Reading this recipe....er...pattern (food on the brain) gives me all the lining yardages for 45" wide fabric.  But my online check at the lining reveals it's a 60" wide bolt.  Yeah!  So I don't need as much, but now I've got to take time to calculate what I DO need.  In other words, I've got to get out all the pattern pieces, figure which ones are for the linings and play with getting them to fit in as little a space as possible without being so stingy that I make mistakes.  It's like a big puzzle.


Mistakes on a ball gown tend to not be small either because we're talking yards of fabric.  I always like to space the skirting pieces further apart in length than the pattern shows to cut them on the material because A) I'm taller than most patterns allow for; and B) I usually hem my formal skirts with horsehair braid to help the skirt not droop and many patterns don't call for this.  It can require a bigger hem allowance than what the pattern calls for (1 1/2" versus 5/8").  And on this gown, remember that I want to "pull up" those poofs of fabric more often than the pattern calls for, so I need more length to make extra tuck ups.  This, however, won't affect the lining (the layer closest to my body), only the taffeta and sheer layers.


But let's remember that the pattern calls for lining AND underlining (a backing to the "real fabric" layer) but that I've converted it.  Let's review and think about these layers:

  • L1-outside billowed skirt layer; fullest, longest amount of material; on the pattern this is taffeta (in my instance), but to make vision dress this would be sheer (organdy in my instance)
  • L2-on the pattern is lining of billowed skirt layer, so cut to the exact same pieces as L1 and made from lining material; but to make vision dress this would be taffeta and shouldn't be as full or long as L1, my thought is to cut it from the same pieces that the pattern's innermost lining is made from; in essence this layer will become the stay that L1 is billowed and attached to
  • L3-on the pattern is referred to as a Stay (a layer made of lining material that isn't as full as L1, which L1 is billowed and attached to); in my case, this would become a backing layer to the taffeta, so should be cut from the same pieces as L2 out of lining material

Now that I've figured this out, I realize I was over-thinking it.  I need just as much lining as I bought of taffeta (both being 60" wide bolts) for the skirt, so 8 1/4 yds.  I know I'll need lining material to make the pockets I intend to add, but I'm confident I'll have enough in the margins of the cut out skirt pieces since they're essentially triangular shaped.


The top requires lining material for both a lining and an underlining - basically 2 of everything I need to cut from the taffeta.  So we'll look at the 60" amount needed for the taffeta and double that to get the proper lining.  1/2 yd x 2 =  1 yd


Total lining needed = 8 1/4 skirt+ 1 top = 9 1/4 total

Monday, January 17, 2011

54 Days To Go-Research

Based on my to-do list from last time, I've been doing a lot of online researching for this project.  Apparently I'm still in left-brain mode?  I've also been on the computer alot fueled by my excitement and ideas over starting the blog, so I'm trying to balance not letting the documentation overwhelm my time for the actual project.  Good thing it's the weekend.


Embroidery


I did talk to my mom and she looked at the French Scrolls embroidery set I found.  The only problem was, we had no idea what file format her machine reads and if it was on the list of availability for that pattern.  Turns out her Husqvarna Designer I takes .shv file formats because it is a floppy disk only machine.  But she does have a conversion program on her computer that can take CD and memory stick formats and convert them for floppy disk.  So while, the pattern is not available in .shv, it IS available in the next model's (Designer I USB) memory stick format.  She needs to find her book to confirm that this line of thinking might work.  Everybody cross your fingers because I'm REALLY in love with the scrolls that this pattern offers.


But my research took me off on a tangent on Viking's website ogling all these IDEAS of things that an embroidery machine could do!  I could sell projects on etsy and through local orders enough to pay off the machine and feed my habit!  I sound like a junkie.


FOCUS.  Dress.  Ball.  54 days.  I just can't stick to one project at a time!  GAH!


Eyelets/Grommets


I tend to call them grommets because that's less confusing than pretty, edged holes in fabric (a la, eyelet fabric).  I found this awesome pictorial on How To Install A Grommet.  They're used a lot on curtains for the rod to pass through, purses for handles, and of course, boots for shoelaces...anywhere you want the fabric to glide but it allows clean, reinforced edges to the hole that's essentially left in the fabric.  So you might see where this would be sturdier in the lace up back of a corset than fabric loops sewn into a seam that the ribbon would pass through.  We're talking the one on the left versus the one on the right.


My eyelets are much smaller than than the one in the tutorial, so they don't have a back.  The eyelet is essentially rolled over or crimped on the backside of the fabric.  I'm still worried about the fabric fray-ability with this technique, but I'm thinking fusible interfacing between the taffeta and lining will provide some stability and maybe even some adhesive.  And while some instructions say to cut a hole in the fabric with scissors prior to inserting the grommet, I think a small X cut might be a more stable way to go.


After reading the instructions to make the corset top on Vogue pattern 2810, I've discovered that durability is added by inserting boning on either side of where the row of grommets will be placed (essentially on the edge of the back and about 3/4" away on the seam just inside of the grommets).  So I might need more boning that I've bought because my pattern doesn't call for boning on the back edges, only on the seams.


As a complete side note:  My online research kept turning up use of eyelets as a scrapbooking technique and so LOTS of beautiful colors have emerged for eyelets besides the traditional gold, nickel, white and black that are available in sewing stores for fabric purposes.  If the scrapbook ones are painted metal (and not plastic), I don't see why they wouldn't be usable on fabric.  Gorgeous colors like these I found at impressrubberstamps.com have me rethinking the ones I bought in favor of something that matches the dress or that pops a pretty metallic!  They're smaller though and my silver ones will accent the embroidery I plan to do.  And silver embellishments on the lilac material helped ease my mind in the war over which color to use on the gown to begin with (since now it's a bit of both).


Petticoat Possibilities


So, the desire to princess out the dress is taking over.  In order words, there is not enough tulle in the world to make this skirt "too full" for my taste.  And while the idea of traveling or bothering with a petticoat was too much to my way of thinking, a few layers of tulle added to the lining between L3 and L2 seemed worthwhile to investigate.


But since the last time I had to look at a petticoat was 10+ years ago, ebay has come along where I can buy a petticoat or a hoop crinoline for as low as $20 which is about $5 more than the online bolts of tulle I've found.  And for all the effort to figure out how to alter/add to the pattern, cut and gather tulle, the $5 seems worth it.  And I'd have a freestanding petti for any other future need, anyone to borrow, etc.


So the question becomes IF I decide to do this, which is better?  A hoop or tulle layers.  The idea of a hoop is appealing because I can get it as full as 6 hoops (we're talking Scarlett O'Hara HUGE which = Halloween costume!!).  But for the sake of my dignity for this occasion, it's adjustable and therefore shrinkable.  But I worry about the comfort and movement of hoops.  I will look like I'm wearing a hoop skirt.  That's just the way they move.  But if I do a petticoat, I wonder if a tulle one would be full enough.  Plus it is bulky to transport versus a hoop skirt because the boning can be removed and coiled in my luggage.


Tired of thinking about it, so I'm going to leave the decision to another day and a bit further along in the process.


To Do List


  • Lay out pattern pieces and iron
  • Calculate the lining I need
  • Get to the other Hancock's in town in time to use my Additional 10% off coupon (ie 8am-12noon) on lining (that's in addition to the 30% off from the MLK sale, last day for that)
  • Cut muslin corset top mock up pieces
  • Browse shop Michael's for beads

Thursday, January 13, 2011

Project: NashCon Ball Gown

So the main point of the blog is to chronicle my projects, so let's start with the major one that I acutely begin today.  In exactly 8 weeks, I'll be departing for Nashville, TN to join my newest, dear group of friends for a Twilight Convention.  I went to one last year and met up with many of the same gals for that one.  For the ball, hosted on Saturday night, I wore a 2-piece Scott McClintock I'd had in my closet for years.  But I joined the planning for that convention a mere 6 weeks before it even happened.  I've been planning on this year's convention since last year, thus I've had a lot of time for ball gown ideas to ruminate.


Being the princess I like to think myself, I wanted to go pretty, long, formal, and utterly me...IOW custom made.  Left-brain process began months ago, but also told me to wait until after Christmas to purchase my supplies and direct my time toward the gown.  I kept coming back to the same look when I flipped through gowns and saved pictures I liked:


Which easy enough lends itself pretty closely to McCall's pattern 5321:


Pattern-Vision Differences

The back closure of the pattern calls for bridal loops and buttons, a PITA to get into compared to the lace-up style that was on the inspiration dress.  And I feel like lace up would give me a more corsetted, held-in, exact garment feel.  But I have reservations (based upon experience with my bridal gown) about sewing in loops sturdy enough to lace up that would actually bind in my very large chest.  Vogue pattern 2810 has a corset top that is eyelet grommeted though, so even though more expensive ($3.99 on sale) I bought it, hoping it'll give me some inspiration or tips to experiment with the grommets. If not, there's always the internet as a source of advice and trial and error on my inevitable mock up.

I learned from my mother that when altering a pattern, especially for a formal gown (which uses more expensive materials), it's always best to play on a muslin mock up.  My rib/waist measurement and my bust have been in quite the size disparity for some time now, so I know I'm going to need to play with combining the 2 different pattern sizes for the top fit and look that I want.  I'll use that mock up to learn how to use grommets as well.

The skirt is gathered/poofed in more places on the vision dress than on the pattern (3 and 2 spots per line instead of the 2 & 1 spots per line).  That'll be easy to play with and add as long as I allow more length.  Something I usually need to do anyway since I'm taller than most patterns fit.  So I'll need to buy more yardage and more buttons or jewels than the pattern calls for to attach in those places.

The vision dress is also, obviously gathered with a sheer material instead of the solid the pattern calls for.  Pattern dress calls for enough lining fabric to make the inner skirt that the billows are attached to (called a Stay on the pattern, in essence it's a skirt that's more A-line and not as full as the top skirt piece) AND an exact replica cut of the billowed layer.  So 3 layers:
L1-outside billowed skirt layer
L2-lining of billowed skirt layer
L3-Stay (straighter lined skirt that billowed skirt is attached to)

To achieve vision dress, I need L1 in sheer material, L2 in "real" material (the stuff that matches what will show on corset top), and L3 in lining.  This poses a few dilemmas.  Pattern dress has the wrong side of L2 facing the wrong side of L1.  But if my L1 is sheer, you're now going to see the exposed seams of L2, so I've got to reverse the way L2 is facing.  And my L2 now needs to be not as full so that I have something to gather the sheer layer onto.  I really need to cut L2 out of "real" material but to the same shape as the lining material.  So I've got to play with how much to buy of each.

I'm going to add pockets on the side seams (easy enough to do to ANY dress), because who can't use pockets instead of lugging around a purse when you want to be footloose and fancy free?

To encourage fullness, I'm still contemplating sewing increasing layers of bulk tulle into the lining (onto L3 under L2), but I'll need to retain a little more fullness in L2 to allow for it to bulk the gown.  This adjustment to L2 might be more trouble than a "petticoated" dress is worth, but I'll decide later as I play with it.

I'm still optimistic that this hasn't gotten too complicated yet.

Color & Material

I decided to go either gray or lavender, but couldn't decide on color.  I wanted something other that satin because it tends to be heavy and weigh itself down.  So I was looking for something lighter, maybe stiffer, to "sit up" on its own and give me the fullness I wanted. 

And some searching of Joanne's and Hancock's yielded some material possibilities.  Hancock's bff line (which carries matching materials, lace, sheers and lining) had a shade in each color that caught my eye and I liked the feel of the taffeta.  There were also plain sheer organdy or a more glittery organza or a type of sequined organdy to chose from for the overlayer.


While most people told me they liked the gray, the lilac is my favorite color, so I couldn't decide.  I contemplated trying to work in both colors.  Sheer layer in one color while the rest of the dress is in the other.  A bust band in the opposite color.  Layering the bust with a peekaboo of the opposite color.  But it came down to what had enough in stock to be bought.

I waited to buy the fabric until the MLK weekend sale started because the patterns went 5/$5 (compared to $16 a piece!  NEVER EVER buy patterns for more than a few dollars unless it's discontinued and you can't find it anymore.  Sales for $1 or $1.99 a piece are common on major holiday weekend sales.)  Buttons were also 50% off and trims were 40-50% off.  And surprise, surprise, the bff collection was 30% off!

At the cutting table, the pewter was 6 yds shy of what I needed and a call to the other store in town and the one in Cinci (I'd be up there to pick up my parents from the airport next week), still didn't yield big enough pieces that the large skirt requires.  But there was plenty of lilac.  Which honestly doesn't hurt my feelings because I can work the silver in plenty of other ways - the embellishments or buttons that tuck up the skirt billows, a wrap, my shoes (which I already found are silver satin peeptoes), and the corset embellishments.  Which brings up a whole. Nuther. Issue.

Corset Embellishments

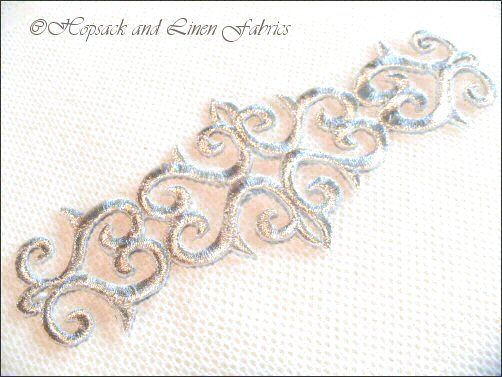
It dawned on me late last night that one of the huge attractions to vision gown are the silver scroll embellishments on the corset.  I have a fixation with anything french scroll-looking, so no wonder.  The question is how to duplicate it and if it's worth it.  I spent some time researching appliques, sequin embellishments, beaded embellishments, and embroidery.  There's a lot of white floral and white lace to be found out there, mostly in the field of bridal embellishments, but not a whole lot of silver unless you head into gaudy territory with all the sequining.  I found a piece on ebay that I ordered, but it's very simple and not dynamic.


I also found this, but haven't ordered it because it's white, not silver.  I'd have to find a way to paint or dye it.


I was contemplating hand stitching if I had enough time, but worry about asymmetry errors.  I wouldn't mind hand beading seed beads, but that's not the bulk of the pattern on vision dress. The ideas behind this are appealing to me as well:


Ultimately, the search turned up scroll embroidery patterns online for download to a sewing machine.  Which I do not have at the moment.  BUT, mom will be here next week and SHE has one.  I have an appointment to web chat with her tonight, see if the set of PERFECT french scroll patterns I found online are compatible with her machine and if she'd be willing to take the unfinished top home to embroider and mail it back to me.  This is all contingent upon getting a mock up that works perfectly, done while she's here and cutting the real pieces to send her home with.  If not, I'll probably look for beads and gems at Michael's to form a sort of central brooch like on the gray dress above.

The Shopping List
  • McCall's pattern 5321
  • Vogue pattern 2810
  • Lilac thread


Top
  • 1/2 yd 60" lilac bff taffeta
  • 1 1/8 yd 45" lilac bff lining
  • 2 yds 1/4" covered boning
  • 1/2 yd of 1/8" bridal loops (JIC my lessons in grommets don't work out)
  • 20 3/8" covered buttons (JIC grommets don't work)
  • Eyelet kit containing 25 grommets and tool
  • Ribbon (1/2" or wider?) (TBD)
  • Any special backing fabric to reinforce the material where the grommets are punched through (TBD)
  • Silver thread for mom to embroider with (TBD)
  • Other embroidery supplies (need to find out what kind of special backing or layer fabrics are needed) (TBD)
  • Embroidery patterns for download (TBD)
  • Beads/gems/seed beads to embroider by hand (TBD)
Skirt
  • 8 1/4 yds (minimum) 60" lilac bff shiny organdy
  • 8 1/4 yds (maximum) 60" lilac bff taffeta
  • Need to figure amount needed of 45" lilac bff lining (lay out pattern pieces for Stay and measure, make sure there's enough scraps to make 2 pockets)
  • 1 1/8 yds 22" sew-in interfacing
  • 7" lilac zipper
  • 2 half moon hook and eye closures
  • 7 1/4 yds (minimum) 1" horse hair braid
  • Decorative buttons/rhinestones (25-30)
Shopping

I got everything that isn't TBD on my list except lining today (because they didn't have enough and I don't have an exact figure calculated).  I hope to pick that up at a Cinci store on Tuesday when I'm up there.  I found 1/4" rhinestone buttons and some 7/16" translucent lilac buttons to mix and scatter at the overskirt pull up locations.  And I purchased 8 yds of silver metallic organdy that was in the clearance bin.  I might use it to accordion fold and gather under the bust line (you can see the effect I'm talking about in the back view of vision dress at the very top) and/or as a wrap.  

To Do List
  • Lay out pattern pieces and iron
  • Calculate the lining I need
  • Talk to mom about embroidery
  • How to use grommets research
  • Cut muslin corset top mock up pieces
  • Browse shop Michael's for beads
  • Research built in petticoat techniques