Showing posts with label patterns. Show all posts

Saturday, February 26, 2011

14 DTG-The Skirt, Taffeta

Now that I know that the lining layer is as full as I was envisioning and works with the petticoat, it's onto the taffeta layer.  It's essentially constructed the same way the lining layer was, from the same pattern pieces.


Under Layer (Outer Layer of the Stay) - Taffeta
  • 10 - Waistband (only 1 cut from material, cut second one from interfacing)
  • 11 - Side stay (cut twice to equal 4 total pieces)
  • 12 - Front stay
  • 13 - Back stay
I've laid out, but not cut, pieces 12 and 13.  I'll start with them first, so that all I'll have left are 2 sets of piece 11 which I'll need to refold the remaining material in the other direction.


Piece 13 cut out of taffeta. You can see the extrapolation
to add length to the bottom compared to the pattern.


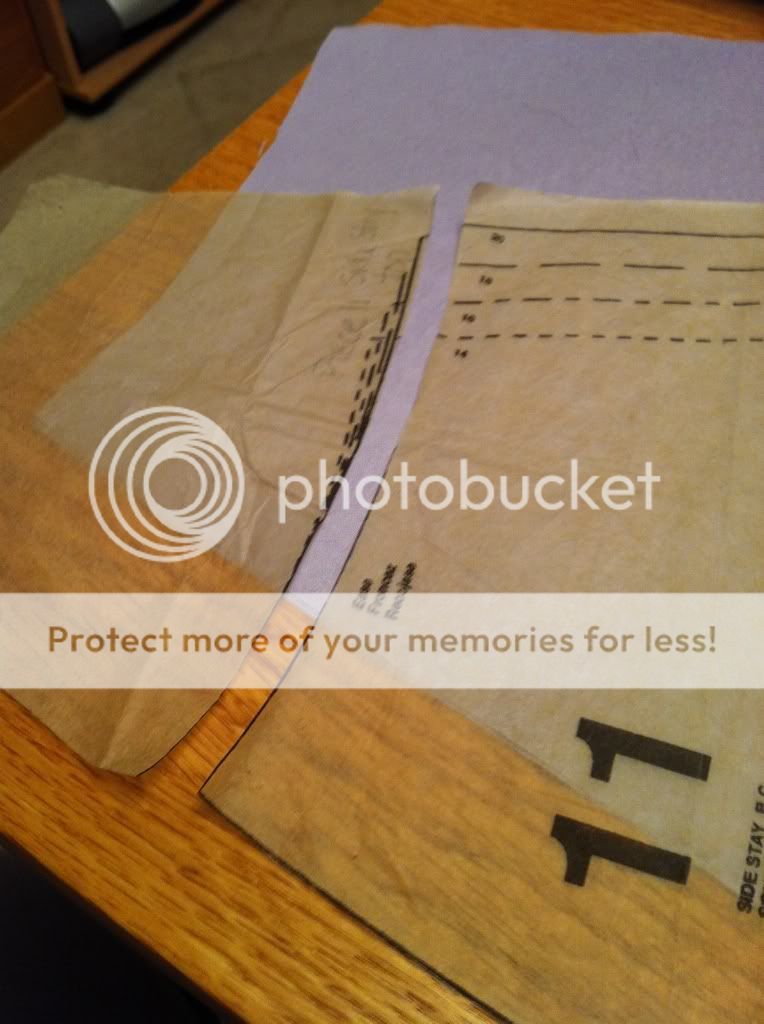
Transferring markings from the pattern to the material


I use a pin through the layers to transfer markings to the bottom layer of fabric


Piece 12, Notice my ironing board in the foreground,
the bolt of remaining fabric across the arms of the chair
in the background and the taped instruction sheets to
the bookshelf for easy reference.


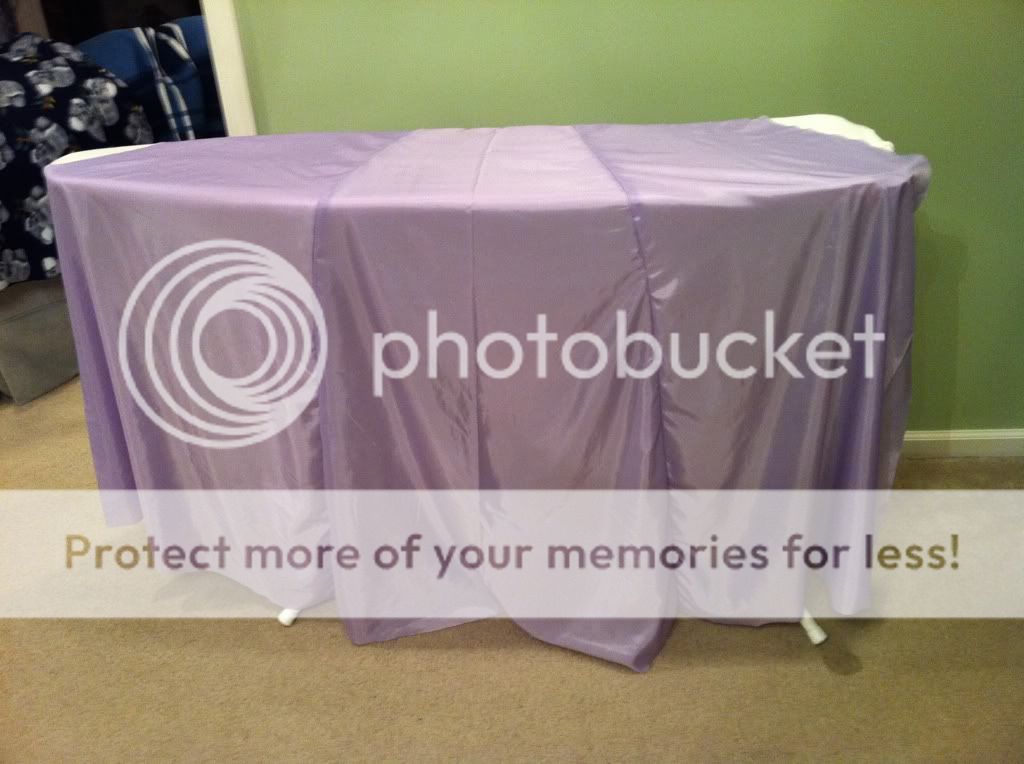
Second set of piece 11.  There's a lot of extra yardage draping off the table on the left.


Once I'm done with these pattern pieces, I'm finished with them, so I can put them away.  There was a section of piece 11 for the other sizes that had been cut off when cutting out material.  I had labeled it in case it got lost floating around, but I reattach it now.


I like to fold my garment pieces together, so they come out as a complete packet if I ever need to use them again.  Then they go back into the pattern envelope.  I'll have to blog sometime on my organization methods, probably when I detail my dream craft room and what I have now.


The last piece I need is a single cut of piece 10 for the skirt waistband, which I take from a left over margin.


Then it's onto assembly!  I'm finally feeling more excited about the outcome of this project than I am stressed about the lack of time to finish it.  I think, since being at the TWO WEEK TO GO mark, the excitement about the trip in general is starting to kick in.  :-)


Just like cutting out the pieces for the taffeta were nearly identical to cutting them for the lining, so is assembly of this layer.

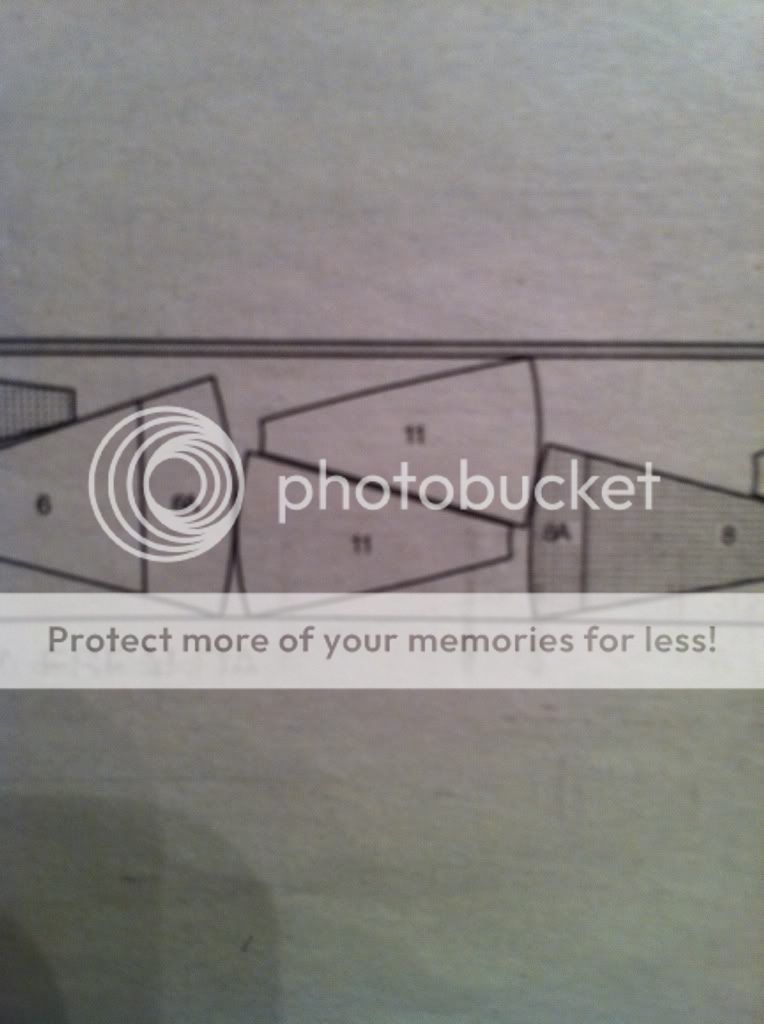
  • Stitch together front half:  11 - 12 - 11
  • Stitch together back center sections 13 - 13 up to large circle, leaving above this mark open.  This will be where the zipper runs.  Clip seam allowance to large circle.
  • Stitch remainder of back half:  11 - 13 - 13 - 11
  • Stitch front and back halves together to create circle.


To Do List
  • Seam allowances of lining and taffeta
  • Figure pockets
  • Join lining and taffeta
    • zipper
    • waistband
    • hem (horse hair)
  • Cut pieces from organdy
  • Assemble organdy layer
  • Finish skirt details

Friday, February 25, 2011

15 DTG-The Skirt, Lining

Let's review what pieces I'm working with for the skirt lining:


Lining Layer (Under Layer of the Stay) - Lining

  • 11 - Side stay (cut twice to equal 4 total pieces)
  • 12 - Front stay
  • 13 - Back stay

First, I stitch together pieces 11 - 12 - 11 to make the front half of the skirt.

Front half:  11 - 12 - 11


To make the back half, I stitch the 2 piece 13s up to the large circle.  The gap in the remainder of this seam is where the zipper will go later.


Next is joining the other set of piece 11s to the outsides of the joined pieces 13. 


I end up with 11 - 13 - 13 - 11


Now, I join the back to the front, essentially joining both piece 11s to the other set of piece 11s.  In the end I'll end up with a circle of:


11 - 12 - 11
/                \
11                11
\               /
13  -  13


I try this on for fit at the waist and over my petticoat to see if the angles of the skirt are full enough.

Assembled lining with my petticoat on

And I fall in love with my dress all over again!!  I'm so excited that it works and is coming together!

To Do List

  • Cut out rest of taffeta pieces
  • Assemble taffeta pieces
  • Join lining and taffeta
    • zipper
    • waistband
    • hem (horse hair)
  • Cut pieces from organdy
  • Assemble organdy layer
  • Finish skirt details

Thursday, February 24, 2011

16 DTG-The Skirt

So after spending ALL DAY yesterday researching machines and visiting a dealer here in town, I've learned that even if I order a machine today, it won't come in for another 6 weeks.  :-(  So unless my mom can get this embroidered, I'm going plain.


In the meantime, I'm onto the skirt.


I had started cutting some of the pieces in order to cut out the top pieces.  I already have piece 12 and 13 cut out of the lining.  I need to cut 2 piece 11s (for a total of 4 pieces).


Piece 11 is a little tricky though.  This is the only piece that has different size markings on it (kind of like pieces 4 and 7 on the top).  To cut out the size that I need, I need the widest bottom on the piece.  Then to expand this by another foot (remember I need additional length for all the reasons I detailed in this post), makes the bottom even wider.


Once I extrapolate the base of the skirt by 12"
(which is marked by the rulers) piece 11 is too wide
to fit on the fabric this way


To solve this, the pattern directions recommend folding the selvages the other way.  Refolding a HUGE piece of fabric like this is a major PITA and has me wishing - again - that I had a better set up than my kitchen table, office chair and ironing board.  LOL


Here's how I normally spread out the fabric.
When it's folded lengthwise, it's just as wide as my table.


Here's the fabric folded in half the other way.
Notice the fold line down the middle left
from when the fabric is folded to roll on a bolt.


I cut 2 sets of piece 11 from the refolded fabric by
inverting the pieces to minimize how much material is used.


To extrapolate the ends of the skirt pieces, I use my quilting tools.


Tomorrow, to make sure the skirt is full enough (both for my tastes and to fit over the petticoat), I'm going to assemble the lining layer before I cut out any more material from taffeta or get started on the organdy.

To Do List
  • Assemble lining layer
  • Cut out rest of taffeta pieces
  • Assemble taffeta pieces
  • Join lining and taffeta
    • zipper
    • waistband
    • hem (horse hair)
  • Cut pieces from organdy
  • Assemble organdy layer
  • Finish skirt details

Thursday, February 17, 2011

24 DTG-Cutting Material

From the lining material, I've cut both the underlining and the lining for all the pieces of the corset top.


I left the pattern papers pinned to the second set of linings (2 of each piece)
and there's a set (2 more of each piece) that you can see in lavender.
Remember, there's 4 pieces cut for each pattern
(for a right and left side of the garment, both lining and underlining layers)
except the middle which is folded in half


I also cut lining for a few skirt pieces, but I've set the rest of the skirt and lining aside for now because I NEED to concentrate on the corset to get. It. Off. To. My. Mom!!!!!!  %&*#!!!  I am super feeling the pressure from the time clock.


Real quick, I knocked out what I need cut from the fusible interfacing.  I need 1 piece 10 from the skirt (waistband) and 2 piece 8 from the corset (back band - remember the fusing reinforces these pieces that the grommets will pierce).  


It was much easier to cut these pieces because I don't have yards and yards to manage of the interfacing like I do the taffeta.  My lack of an actual cutting table is frustrating at times like these.  My dining room table (4x6) with a chair on one end and the ironing board on the other end to lengthen the surface area and catch the overhang of yardage is cumbersome, but it works.  For now.


Now onto cutting the pieces I need from the taffeta, utilizing the same layout technique that I used for the lining.  I only need one set of all the corset pattern pieces from this material.  And the same pieces for the skirt as I cut on the lining, plus a piece 10.  But again, only going to cut what I need to of the skirt to determine where I need to take my corset pieces from and leave the rest of the skirt until later.


Here you can see each individual piece laid out carefully with
"right sides" up and in the order I need to sew them together


Taffeta doesn't really have a "right side/wrong side" to it.  But I'm a-type enough to want to keep track.  My thinking being that the "underside" of the fabric (the inside of the material when it's folded in half on the bolt) has been treated differently in processing, packaging and shipping than the "outer side" of the material which is exposed.  In case any slight variations exist that I can't see now, but may show as the fabric ages or is worn and then cleaned, I like to track the sides.  And since they look the same to me now, it takes some careful planning and purposeful intention with how I place my fabric now.  Hence the reason I unfolded and laid out the pieces, right side up as shown above.


For instance, piece 8 has not only match up arrows to be cut out of the sides, but also has match up circles on the interior of the piece.  They're best marked with a washable pencil on the "underside" (or wrong side) of the fabric so that in the course of sewing, they won't show on the garment.  I marked on the muslin with regular pencil without care about anything showing because ease saves time and the point of the muslin was to quickly assess pattern fit.


See the difference in how I cut notches into the edge for the arrows
on the pattern versus how I marked where the circles are


To Do List


  • Embroidery
    • communicate with mom
    • order pattern off internet
    • get supplies she needs
  • Begin The Real Thing assembly (cause need to get it off to mom in the mail!)
  • Browse/shop Michael's for beads and embellishments
  • Browse/shop for ribbon to lace up back - appropriate color and thickness

Wednesday, February 16, 2011

26 DTG-Getting Down to The Real Thing

My poor pattern pieces 4 and 7 have taken a lot of beating during the modifications I've made.  These are also the only two pieces that have different cutting lines for different sizes.  This hasn't been a problem thus far because I've been working off the largest size in the pattern.  Therefore, I didn't need to cut anything off the pattern.  But since my modifications, I'll need to cut the pieces to a size smaller than the largest.

I can handle this a few ways: a) cut the largest piece out then just trim the fabric down to the size I need on the edges that require modifications; b) cut through the pattern on the correct line for the size I need and either keep track of the paper piece by labeling it or immediately taping it back on; or c) making a copy of the piece at the size and with the modifications I need.

Normally, I choose b. For the integrity of the pattern, in case I change sizes or need to use the pattern again for someone else, I try to immediately tape the cut off piece back onto the pattern, in the correct place.  Trying to put pieces back on 5 years from now, when I may reuse it, is a pain and some of the cut offs are quite small and easily mistaken as scraps and thrown away.  More about this later when I cut out the skirt pieces from organdy.

But since I also have made modifications to 4 and 7 in addition to just needing to cut down to a smaller size, I've chosen to re-draw them.  This way I can extrapolate the seam allowance and mark the kick ins that I did on the lower section of these pieces before I even cut out the material.  It makes for cleaner, more uniform pieces (important for the lining and outer layers to match up well).


My newly made pieces in the middle, originals to the outside


Piece 4 - original on top, my copy on bottom
I use black marker to outline after I measure out my
extrapolations in pencil so it screams CUT ME HERE.


Piece 7 - Original on top, my copy on bottom
You can see the difference in the angulations I pulled in at the hip line

I talked earlier about how the pattern instructions give a map of how to lay out the pattern pieces to minimize material yardage, so you don't have to play with the pieces to fit them together in the most economical way.  They've already done it for you.  But in this case I have to be different.

Of course.

See, the material needed was given as separate measurements for the top (7/8 yd) and the skirt (8 1/4 yds), which is useful when you're making only one or the other, or in my case, modifying any layer of the pattern (like I'm doing with the skirt).  However, this can potentially waste a lot of material.  The skirt pieces are very wide at the bottom and thinner at the top (almost like a triangle), so when they are laid out on the material, there's a lot of unused space where the triangle is thinnest.  This is space where the top pieces could be taken out of, instead of all being put together on their own 7/8 yd of material.

So, to be most efficient, before I can cut the top pieces for The Real Thing, I need to do some work with the skirt pattern.

Pattern Work - Skirt

Remember long, long ago when I had separated my pattern pieces into piles - top, outside skirt layer, stay skirt layer?  Well, my skirt piles need a little additional work.  Because the bottom of the triangular pattern pieces are so wide, they generally don't fit on the standard length of tissue paper that the companies print the patterns on. So they put part of the triangle in one place and part of it in another on those sheets, and I have to tack them together.  So as I ironed the wrinkles out of my pieces, I assembled the extensions (bottoms) onto the skirt pieces.


Pattern piece 8 (over the chair back) and it's extension prior to joining

Skirt (Garment B)
  Outer Layer - Organdy
  • 6 & 6A - Side front & extension
  • 7 - Front
  • 8 & 8A - Back & extension
  • 9 & 9A - Side back & extension
  Under Layer (Outer Layer of the Stay) - Taffeta
  • 10 - Waistband (only 1 cut from material, cut second one from interfacing)
  • 11 - Side stay (cut twice to equal 4 total pieces)
  • 12 - Front stay
  • 13 - Back stay
  Lining Layer (Under Layer of the Stay) - Lining
  • 11 - Side stay (cut twice to equal 4 total pieces)
  • 12 - Front stay
  • 13 - Back stay
Cutting Material

I start with the lining, spacing my skirt pieces well away from each other because I need to add length to it for a few reasons.  
  1. At 5-9, I'm taller than the average woman's pattern is made for
  2. I plan to wear heels with this gown, making me even taller
  3. I plan to make more of those billowed pull ups on my version compared to what the pattern calls for so that takes more yardage (NOTE: This should only affect the outermost organdy layer)
  4. Patterns tend to only allow for a 5/8" hem on the skirt.  For a full length gown, especially when using horse hair braid, I like to have a 1 1/2" hem.
  5. Since I have the material to spare, it never hurts to cut the pieces longer.  It does, however, hurt to cut them not-long-enough.  Why not be safer than sorrier?
I start with piece 12 because it needs to be on the fold as the front center.  This leaves plenty of room above it for corset pieces.  I need to cut each top piece twice, making 4 (or 2 in the case of the front center) of each piece because the pattern calls for an underlining and a lining.  I didn't do this for the mock-up because it was made from muslin, a type of cotton which already has a lot of body.  The more delicate formal fabrics need some help to add thickness and heft so a layer of lining is basted directly to the back of the taffeta, and the two layers are worked together as if they're one.  (For example, mom will embroider through both of these layers and then the lining layer will keep the back of the embroidery from contacting my skin.)


Skirt lining #12, top lining #2, #3, #4, #7, #6
Room left for second cutting of #2, #3, #6


Skirt lining #13, top lining #9
Room left for second cutting of #9

To Do List


  • Embroidery
    • communicate with mom 
    • order pattern off internet 
    • get supplies she needs
  • Continue laying out pattern pieces on lining and taffeta
  • Cut final top pieces from taffeta and lining
  • Begin The Real Thing assembly (cause need to get it off to mom in the mail!)
  • Browse/shop Michael's for beads and embellishments
  • Browse/shop for ribbon to lace up back - appropriate color and thickness

Tuesday, February 15, 2011

28 DTG-Embroidery Decisions

The placement for the embroidery has become an intense study of the original pictures of the dream dress to figure how the look was achieved and how to duplicate it.


Remember, I had found these embroidery patterns for download from online which my mom can utilize with her embroidery machine.


To simulate the front, center medallion between the bust, I plan to look for a bejeweled and/or beaded piece at Michael's.


But upon close inspection, I see what appears to be a folded ribbon of material under the bust line and draped under the embroidery, peaking out at the hip.  To me, it looks like the same sheer that's used on the overlayer of the skirt, giving texture to the top.  Alot of the examples that I highlighted and liked had the same distinction under the bust, and I like the idea of the added texture.  So I think I'll try to simulate this by accordioning some of the silver sparkle organdy that I bought, having no known intention for it.


There's also a small line of crystal beading around the very top edge of the bust too, which given an appropriate amount of time and if I happen upon the right supplies, I'd be game to hand sewing on.


To communicate with my mom, which pieces of embroidery I'd like where, I decided to work everything out on the mock up.  With pencil (part of the beauty of using a mock up), I drew where the bust line and the hip line are all the way around.


Here I point out the 2 lines on the side and where they come out on the back.  (Which reminds me, I need to look into building a modesty panel, cause no matter the thickness of the ribbon, that line of my spanx is going to be showing through.)  The goal being to fill above the bust line and below the hip line with looping and scrolly embroidery.


I downloaded pics of the graphics of each of the embroidery pattern pieces (the "satin" designs versus the bean stitch, 5-pass or chain stitch ones because the satin stitch are the filled in patterns).  I did a bit of computer graphic work (cropping and resizing) on each downloaded piece and then copied all the graphics into a word document.  I resized each according to the dimensions given on the pattern site and printed out several copies of each piece and each piece's mirror image (to create symmetry on opposite sides of the corset).  Cut them out and went to work creating the look I was after.


Once I started pinning them on while wearing the corset
so I got a better follow to the curvatures, I modified
them a bit compared to what I had laid out


All the embroidery will be in metallic silver thread, not the multi colors that are shown here.  I printed them in various colors as a key, so my mom would know which pieces coordinate to which embroidery pattern.  Now to get The Real Thing finished and sent off to her and to talk to her about the details of purchasing the supplies and pattern and getting it done!


To Do List
  • Make clean pattern copies of much worked pieces (so far 4 and 7)
  • Skirt pattern work - assemble and iron
  • Lay out pattern pieces on lining and taffeta
  • Cut final top pieces from taffeta and lining
  • Begin The Real Thing assembly (cause need to get it off to mom in the mail!)
  • Modesty panel construction research
  • Browse/shop Michael's for beads and embellishments
  • Browse/shop for ribbon to lace up back - appropriate color and thickness

Sunday, February 13, 2011

29 DTG-Mock Up, Take 4, Continued

According to plan, I got into my undergarments, laced up the mock up and tried it on today.  Since beginning this, I've taken it in 2 sizes from what I originally measured I would need (according to the pattern measurements).  Bad news.

It still touches in the back.  UG!  I'm at my wit's end here.

The side seams do still dramatically flare out at the hip like the previous mock ups, so I kicked in those seams by 1/2 inch.  And made that same adjustment to the 4/7/6 pieces of the lining that I haven't attached to the main body of the mock up yet.  And tracked that change on my pattern pieces.

But I'm still completely at a loss to figure out how to make this work lacing up in the back.

So I got out my original picture and studied it.  Consulted DH and my mom.  And potentially have a plan to try.


Upon close inspection, the back lacing does touch at the bottom (hip line) but Vs outward at the top where the gap is greatest.  While on the picture it looks like this is accomplished by narrowing the top of the back pieces (that'd be piece 6 in my pattern), I'm wary of doing that to my pattern.  Right now those pieces run even all the way down the dress, lending support to the pieces attached to them that the grommets will run through.  By tapering piece 6, I'll be cutting them on more of a diagonal angle, across the grain of the fabric, which can slightly weaken the support these pieces now supply.

So my next option is to taper in the tops of the seam between pieces 6 and 7 or 7 and 4.  Mom votes for the seam between 7 and 4 because this is where the adjustments are made for the sizing differences, and I agree with her.  But she recommended, instead of taking in the taper along the entire seam, to only take it off of the side of piece 7, leaving piece 4 alone.  (This is the same concept as what I did to the bottom of seam 7 where it meets 6 when I was trying to fix that hip flare on the last mock up.)  This makes sense because piece 7 is wider at the top than piece 4, so it would "even them up" as to what they're contributing to the measurements around me.

This involves more seam ripping.  Of course.

I shaved off a tapered 1/2 inch from piece 7 where it meets 4 and re-sewed the new seam.


I tried on again and finally - SUCCESS!!  Once I was laced in, there was a 1 1/2 inch gap in the lacing at the top, which tapered down to touching at the hip line. Halle-FREAKIN-lujah!!


To complete the mock up, I attached the 4/7/6 pieces on the lining back onto the main body of the corset.  Then sewed down the seam allowances and reinserted the 3 pieces of boning on each side.  I sewed together the tops and bottoms of the lining and outer layer over the replaced panels.  Turned the garment right side out again, pressed the top and bottom seams, sewed down the back edges, laced it back up and tried it on one last time.


To Do List

  • Map out plan for embroidery
    • which designs where
    • communicate with mom
    • order pattern off internet
    • get supplies she needs
  • Make clean pattern copies of much worked pieces (so far 4 and 7)
  • Skirt pattern work - assemble and iron
  • Lay out pattern pieces on lining and taffeta
  • Cut final top pieces from taffeta and lining
  • Begin The Real Thing assembly (cause need to get it off to mom in the mail!)
  • Browse/shop Michael's for beads and embellishments
  • Think specifically on the petticoat issue - get it ordered accordingly

Thursday, February 10, 2011

30 DTG-Mock Up, Take 4

Are you all still with me?


Truth be told, my 10-day hiatus from this project was partially brought on by how gut-wrenching it is to have to tear something apart when it's this far together.  So I did the taxes and took a side trip for another project (see Project: Ashley's Alterations).  And I'm stalling.  So first, I cut 4 new pieces 4 and 7 (2 sets-1 for the lining and 1 for the outer layer) out of muslin to the next size down.  Remember, those are the only 2 pieces with any variations for different sizes.  Because I'm going down a size, I'll sew them in first and then take the same knock in alterations at the hip line that I did before, testing if those are necessary now that everything will be tighter (being the next size down).


I stitched together all 4 of the new 4 and 7 pieces.  Removed the ribbon I had lacing up the back.


Demolition


Then I started in with the seam ripper.  *insert crying here as I toil over my garment*


First the back edges that closed the 2 sides together.  Then turned the garment (now back to being essentially a tube) back inside out.  And I removed the top and bottom seams only over the 3 pieces I need to remove from each size and layer.  Remember, I have to do each of these steps 4 times because I'm removing from the lining layer AND the outer layer.  The goal here is to leave the front center pieces as together as I can while only replacing the side pieces to save time, work and materials.


I took off the 4 back pieces (#6), and seam ripped the boning out of the lining at that seam (trying to preserve material here).  And then removed the 4/7 combo pieces where they attach to the side fronts (piece 3) and took the boning out of those seams too.  No need to rip 4 apart from 7 because I need to replace them with whole new ones and that's just wasted time and effort.  But I did remove the boning from where those seams meet.


Here's what I was left with after demolition-hard to see,
but this is lining side up and it's still stitched to the outer layer
at the top and bottom seams.


I pressed the outer edges back out flat (they were all folded over from ironing the seam allowances down) and repressed my pieces 6 that had been removed and were kinda hanging out by themselves.


Reconstruction


Then I sewed my pieces 6 back to the outer edges of pieces 7 and pressed the seam allowances.


Here's the lining version of the new pieces 4 and 7 with
back piece 6 attached to the outside.  Notice I left in the boning
running on the very outside edge of piece 6.  No need to take that
apart since that seam isn't affected.


Then reattached the replacement 4/7/6 pieces to the front part of the corset only for the outer layer.  I need to experiment with the fit as to whether or not I need to kick those lower seams at the hips back in, now that I'm on the smaller size.


I pressed my seam allowances and will be ready tomorrow to suite up in my undergarments, re-lace this baby back up and try it on to see where I sit at the hips!


To Do List

  • Re-lace back
  • Try on!
  • Make adjustments to hips
  • Duplicate correct adjustments onto lining pieces
  • Attach 4/7/6 pieces of lining back onto main body of mock-up
  • Sew down seam allowances to re-insert boning (3 on each side)
  • Insert boning, baste across ends
  • Sew together top and bottom of replaced panels
  • Turn garment right sides out again
  • Press top and bottom seams
  • Sew down back edges
  • Try on 1 last time!
  • Evaluate
  • Get on to mapping out where I want embroidery
  • The Real Thing!!

Saturday, January 29, 2011

43 DTG-Mock Up, Take 3, Continued

Now that I've made the adjustments to the hip lines so this portion of the back is now also just touching (not overlapping), I'm going to proceed with the full mock-up to get a feel for the lacing up play in the back.


Using the modifications I made to the pattern pieces, I've cut a second set of pieces from the muslin to act as my lining layer and assembled them in the same manner I did the outer layer.  The lining layer just does not have piece 8 (back band) on the edges of the back (see 46 Days To Go).


The lining does, however, contain the strips of boning that give the garment it's support and shape.  Although I intend to wear my spanx and my strapless bra, every little bit of support to hold Da Girls up and in helps. Plus this will (hopefully) shrink the appearance of my waist by highlighting that it IS smaller than my bust and my hips, thereby making me look...better?  Maybe. Suffice it to say, I'm not thin and angular anymore, like I was in my wedding dress when I could afford to go without the undergarments because what the dress offered was plenty when everything was already standing on end.


Anyway.


I'm going to put boning in the lining and once I've determined everything, take it out and reuse it on The Real Thing.  To insert the boning, I need to sew channels for it to slip into.


After each piece of lining is sewn together and the seams pressed,
I top stitch the seam allowance down, 3/8" away from the seam.


This is what 'top stitching' looks like from the finished side
- basically just another sewn line next to the seam

This is done for a variety of reasons - looks, reinforcing the seam,
tacking down the seam in thicker material (jeans),
or in my case to create a channel for boning.


Plastic boning comes in a canvas sleeve


Some patterns call for the casing the boning comes in to be sewn to the lining and then the plastic kept in the casing.  Since this pattern calls for channels to be made from the lining seam allowances, I'll remove the plastic part and discard the canvas outer layer.


The pattern calls for me to measure and cut pieces of boning the same length as each seam (10 pieces) then to cut 1" from each end of the boning and round the tip off.  Since this is collectively a waste of 20" of boning (2" per piece x 10 pieces), I'll be measuring the pieces 1" from each end before cutting them.  Duh.


I round off the edges using a nail file or piece of course grit sand paper.  I want to be sure and avoid sharp edges.  A lot of weight is riding on the pressure points of the boning, which could cause them to push through if there's any corners.


The lining would over hang the back edges of the corset where piece 8 was sewn  on and the seams were pressed under.  To solve this, the pattern calls for the lining back edge to be pressed under by 5/8", and to top stitch the seam allowance down 3/8" away from the folded crease, forming 2 more channels for boning (and providing another opportunity for support at the lacing edges).


Back edge channel for boning


I follow the same procedure to cut 2 pieces of boning and round them off.  The pattern also called for 2 pieces of boning in similar casings on the front inside edges, but this was when the front was 2 separate pieces that attached by hook and eye.  Now that my front is one solid piece, this probably won't work for a place for boning.  All total, I've got 12 pieces of boning.  Note that the original McCall's pattern (with only 7 pieces) only had 8 pieces of boning.  So I've gained 4 more pieces of boning and more support with this Vogue pattern.


I insert all the pieces of boning in their channels and...


Baste 5/8" from the lower and upper edges across each of the 12 channels


Tops of a few channels that are basted - the corset
is naturally curling up toward the camera now because of the curve of the plastic inserts.

Almost there!  But I'm exhausted and have a long day ahead tomorrow.  Have to stop somewhere, so thus it is.

To Do List
  • Stitch outer layer and lining together
  • Turn right side, press
  • Stitch together back seams
  • Thread ribbon where grommets should be
  • Try on!!
  • Pray I don't need any more modifications (cause that'd be Mock Up 4)

Thursday, January 27, 2011

44 DTG-Mock Up, Take 3

I took in the side seams by 1 size (by another 5/8") and took in the hip an additional 1/4".  1/4" on each side of the fabric that makes up the seam = 1/2" off each side, which is a whole additional inch off the garment (there's 2 side seams).

The right, blue line is the original seam, the left pencil line
shows how I tapered to kick it in another 1/4" (1/2" total") taking
in the hip

Now I've got the waist and bust touching in the back, and still have some major overlap at the hip.  I worry that this doesn't leave enough play.  But I'm going to correct the hip overlap first and proceed from there.

I've taken in another 1/2" of each side of the bottom part of the seams between pieces 4 and 7, which is an inch off each side so 2 inches total.  And there's still about an inch of overlap at the hip in the back.

So now I'm concentrating on the seam between pieces 6 and 7 because this angles out severely on the bottom portion as well and I'm trying to tame in those flares.  Apparently, I'm not as hourglass shaped as I used to be.  Ahem.

6  -  7  -  4  -  3  -  2  -  9 (center)  -  2  -  3  -  4  -  7  -  6
Here's the corset laid out.  You can see where the bottom flares out
to accomodate wide hips.  I've taken in the bottom of the 4 - 7 seam twice
and still need to take in more so I'm looking at the outer most seams

I've penciled in where I'll pull in the left side of piece 7 to get rid of some of the overlap

I want to leave the width of piece 6 and just pull in the kicked out of piece 7, so I will need to get out my favor sewing tool: The Seam Ripper.  I'll undo my stitches, from about the match up arrow down, trim off the 1/2" from piece 7 and re-sew the seam.  On both sides, of course.


To Do List

  • Proceed with stitching together lining according to pieces now that I've made changes
  • Add boning to mock-up lining
  • Stitch together lining and outer layer
  • Thread ribbon through where the grommets should be to get the lacing affect
  • Try on and see how much play I have if any
  • Make adjustments if necessary
  • Proceed to The Real Thing

46 DTG-Mock Up, Take 2, Continued

Well, things have gotten complicated.  *insert eyeroll here because this is what happens to ALL my projects when left-brain starts taking over*


Now that I'm very closely reading the Vogue directions, I realize piece 8 (Back band) is NOT a flap that lays under the laced up ribbon (like a back guard so my skin wouldn't be showing between the lacings).  It is actually the reinforced piece where I'm supposed to poke the grommets through.  It's partially assembled and then sewn onto the edge of the back to give it a little more stability.  But this means that it adds additional width to the back of the corset.  Where my mom was able to make the sides meet in the back when I tried the top on, they may very well overlap with the addition of these two pieces which will give me no play to pull the lacings tight.  For this "play" I will actually need a 2 inch (or larger) gap between the finished edges of the back.  So...I made them and assembled them onto the mock up.


Folded length-wise, right sides together, stitch across ends, trim seam allowance

Turn right side out. To make a sharp corner I use a knitting needle
or wooden skewer to turn out the ends.


Press, baste across open edges


Pin to outside of each back (piece 6) between large circles, stitch


The large circles I marked on pieces #6 didn't convey in this pic,
so I've accented them. These were transferred from the pattern with a
washable cloth marker when I cut out the pieces.


Press seam in. You can see the large circles drawn
onto the fabric better in these pics.  That protruding edge
is where the grommets will get punched on the finished product.


Once I tried the modified top on and had hubby pin me tightly into it, we realized I have a 2 inch overlap!!  What an ego boost!  He marked where he had pinned me in with pencil so I have guidelines to measure.  The beauty of a mock-up is being able to draw all over the cheap fabric, knowing I won't be actually wearing this working garment.


I've got some room to take in the hip, waist and
even more at the bust (I know!  Shocking that my
bust needs the most taking in)


All of the pattern pieces are cut the same for all sizes except where pieces 4 and 7 meet at the side seam.  So this will be the place I need to take in the garment to get the back seams to gap for the lacings.


The various dotted lines are the places to cut for different sizes.

The marks DH made on the back indicate I could do with 2 inches off, but I'm going to sew in the seam one size at a time and keep trying it on.


To Do List

  • Mock up, take 3
  • Whatever the last To Do List said since I got side-tracked from it today *insert grimace face here*