Showing posts with label fabric. Show all posts

Saturday, February 26, 2011

14 DTG-The Skirt, Taffeta

Now that I know that the lining layer is as full as I was envisioning and works with the petticoat, it's onto the taffeta layer.  It's essentially constructed the same way the lining layer was, from the same pattern pieces.


Under Layer (Outer Layer of the Stay) - Taffeta
  • 10 - Waistband (only 1 cut from material, cut second one from interfacing)
  • 11 - Side stay (cut twice to equal 4 total pieces)
  • 12 - Front stay
  • 13 - Back stay
I've laid out, but not cut, pieces 12 and 13.  I'll start with them first, so that all I'll have left are 2 sets of piece 11 which I'll need to refold the remaining material in the other direction.


Piece 13 cut out of taffeta. You can see the extrapolation
to add length to the bottom compared to the pattern.


Transferring markings from the pattern to the material


I use a pin through the layers to transfer markings to the bottom layer of fabric


Piece 12, Notice my ironing board in the foreground,
the bolt of remaining fabric across the arms of the chair
in the background and the taped instruction sheets to
the bookshelf for easy reference.


Second set of piece 11.  There's a lot of extra yardage draping off the table on the left.


Once I'm done with these pattern pieces, I'm finished with them, so I can put them away.  There was a section of piece 11 for the other sizes that had been cut off when cutting out material.  I had labeled it in case it got lost floating around, but I reattach it now.


I like to fold my garment pieces together, so they come out as a complete packet if I ever need to use them again.  Then they go back into the pattern envelope.  I'll have to blog sometime on my organization methods, probably when I detail my dream craft room and what I have now.


The last piece I need is a single cut of piece 10 for the skirt waistband, which I take from a left over margin.


Then it's onto assembly!  I'm finally feeling more excited about the outcome of this project than I am stressed about the lack of time to finish it.  I think, since being at the TWO WEEK TO GO mark, the excitement about the trip in general is starting to kick in.  :-)


Just like cutting out the pieces for the taffeta were nearly identical to cutting them for the lining, so is assembly of this layer.

  • Stitch together front half:  11 - 12 - 11
  • Stitch together back center sections 13 - 13 up to large circle, leaving above this mark open.  This will be where the zipper runs.  Clip seam allowance to large circle.
  • Stitch remainder of back half:  11 - 13 - 13 - 11
  • Stitch front and back halves together to create circle.


To Do List
  • Seam allowances of lining and taffeta
  • Figure pockets
  • Join lining and taffeta
    • zipper
    • waistband
    • hem (horse hair)
  • Cut pieces from organdy
  • Assemble organdy layer
  • Finish skirt details

Friday, February 25, 2011

15 DTG-The Skirt, Lining

Let's review what pieces I'm working with for the skirt lining:


Lining Layer (Under Layer of the Stay) - Lining

  • 11 - Side stay (cut twice to equal 4 total pieces)
  • 12 - Front stay
  • 13 - Back stay

First, I stitch together pieces 11 - 12 - 11 to make the front half of the skirt.

Front half:  11 - 12 - 11


To make the back half, I stitch the 2 piece 13s up to the large circle.  The gap in the remainder of this seam is where the zipper will go later.


Next is joining the other set of piece 11s to the outsides of the joined pieces 13. 


I end up with 11 - 13 - 13 - 11


Now, I join the back to the front, essentially joining both piece 11s to the other set of piece 11s.  In the end I'll end up with a circle of:


11 - 12 - 11
/                \
11                11
\               /
13  -  13


I try this on for fit at the waist and over my petticoat to see if the angles of the skirt are full enough.

Assembled lining with my petticoat on

And I fall in love with my dress all over again!!  I'm so excited that it works and is coming together!

To Do List

  • Cut out rest of taffeta pieces
  • Assemble taffeta pieces
  • Join lining and taffeta
    • zipper
    • waistband
    • hem (horse hair)
  • Cut pieces from organdy
  • Assemble organdy layer
  • Finish skirt details

Thursday, February 24, 2011

16 DTG-The Skirt

So after spending ALL DAY yesterday researching machines and visiting a dealer here in town, I've learned that even if I order a machine today, it won't come in for another 6 weeks.  :-(  So unless my mom can get this embroidered, I'm going plain.


In the meantime, I'm onto the skirt.


I had started cutting some of the pieces in order to cut out the top pieces.  I already have piece 12 and 13 cut out of the lining.  I need to cut 2 piece 11s (for a total of 4 pieces).


Piece 11 is a little tricky though.  This is the only piece that has different size markings on it (kind of like pieces 4 and 7 on the top).  To cut out the size that I need, I need the widest bottom on the piece.  Then to expand this by another foot (remember I need additional length for all the reasons I detailed in this post), makes the bottom even wider.


Once I extrapolate the base of the skirt by 12"
(which is marked by the rulers) piece 11 is too wide
to fit on the fabric this way


To solve this, the pattern directions recommend folding the selvages the other way.  Refolding a HUGE piece of fabric like this is a major PITA and has me wishing - again - that I had a better set up than my kitchen table, office chair and ironing board.  LOL


Here's how I normally spread out the fabric.
When it's folded lengthwise, it's just as wide as my table.


Here's the fabric folded in half the other way.
Notice the fold line down the middle left
from when the fabric is folded to roll on a bolt.


I cut 2 sets of piece 11 from the refolded fabric by
inverting the pieces to minimize how much material is used.


To extrapolate the ends of the skirt pieces, I use my quilting tools.


Tomorrow, to make sure the skirt is full enough (both for my tastes and to fit over the petticoat), I'm going to assemble the lining layer before I cut out any more material from taffeta or get started on the organdy.

To Do List
  • Assemble lining layer
  • Cut out rest of taffeta pieces
  • Assemble taffeta pieces
  • Join lining and taffeta
    • zipper
    • waistband
    • hem (horse hair)
  • Cut pieces from organdy
  • Assemble organdy layer
  • Finish skirt details

Wednesday, February 23, 2011

22 DTG-Petticoat & The Real Thing

My petticoat came in yesterday, but I didn't have a chance to try it on!


It came all petite-ly packaged, encouraging for transport


I carefully took note of how it was folded up, but it came with a step-by-step instruction sheet detailing how to get it back in its collapsed condition.


I LOVE how full it is, especially that the tulle layers hide the
"hoop look" giving extra fullness


Starting Construction


Although the Vogue pattern that I am using for the corset top doesn't call for underlining, the construction of the McCall's top that originally came with the dress, did call for one.  So taking the best practices from each top (since I merged some of both patterns, mostly relying on the Vogue pieces), I had cut two sets of lining for a lining and underlining.


I purchased 2 different colors of thread, based on best coloring matching of the various materials (taffeta, organdy, and lining).  And how I sew through the various steps can be determined by which threads I'm using in which positions (the top spool and the bobbin from underneath the machine).


  • Coats and Clark Dual Duty XP 250 yds All Purpose 3620-Lavender Bliss (color matches taffeta)
  • Coats and Clark Dual Duty XP 250 yds All Purpose 3340-Light Violet (color matches lining)

I baste together a piece of underlining on the "wrong" side of each piece of taffeta.  Basting stitches are longer because they are made to temporarily hold together 2 pieces until permanent seams are put in and are usually ripped out later.  I use 6 for basting (the longest setting on my machine) versus 10-12 for regular seams.

I kinda messed up because I forgot about the color switch trick for basting.  Instead of "wasting" some of the good, color matched threads for basting (because they're just going to get ripped out and thrown away later), I like to use black or white bulk thread.  The bulk thread is cheaper and is usually generic quality.  And by using a contrasting color to those that match the fabrics, it's easy to see what I need to make sure and later remove.

Instead, to baste, I used Lavender Bliss on the top and Light Violet on the bobbin, matching each thread to it's appropriate material side.

Underlining (seen on the turned up piece) basted to taffeta pieces 

The pattern calls for certain places of the pieces to be reinforced by "staystitching" on the edges.  Staystitching is a line of straight stitches, smaller than basting, usually about the same stitch length as what you use for seams.  Smaller stitch lengths are harder to unravel if something should pop and harder to pop if the seams strain.  In other words, smaller stitches equal a stronger garment.  Staystitching, occurs about an 1/8" from the seam (which is at 5/8" so I staystitch at 1/2"), and is used on seams that curve (such as at the bust) because this is where more strain will be placed on the garment.  On my garment, staystiching is called from between the 2 match up arrows on the sides of the front center piece (right where the bust will curve outward to accommodate Da Girls) and along the curve of the sweetheart neckline.

Staystitching between the 2 match up arrows on
sides of front center piece

To Do List
  • Stitch all pieces together
  • Stitch all lining layer pieces together
  • Stitch down seam allowances on lining
  • Stitch layers together
  • Send off to mom

Thursday, February 17, 2011

24 DTG-Cutting Material

From the lining material, I've cut both the underlining and the lining for all the pieces of the corset top.


I left the pattern papers pinned to the second set of linings (2 of each piece)
and there's a set (2 more of each piece) that you can see in lavender.
Remember, there's 4 pieces cut for each pattern
(for a right and left side of the garment, both lining and underlining layers)
except the middle which is folded in half


I also cut lining for a few skirt pieces, but I've set the rest of the skirt and lining aside for now because I NEED to concentrate on the corset to get. It. Off. To. My. Mom!!!!!!  %&*#!!!  I am super feeling the pressure from the time clock.


Real quick, I knocked out what I need cut from the fusible interfacing.  I need 1 piece 10 from the skirt (waistband) and 2 piece 8 from the corset (back band - remember the fusing reinforces these pieces that the grommets will pierce).  


It was much easier to cut these pieces because I don't have yards and yards to manage of the interfacing like I do the taffeta.  My lack of an actual cutting table is frustrating at times like these.  My dining room table (4x6) with a chair on one end and the ironing board on the other end to lengthen the surface area and catch the overhang of yardage is cumbersome, but it works.  For now.


Now onto cutting the pieces I need from the taffeta, utilizing the same layout technique that I used for the lining.  I only need one set of all the corset pattern pieces from this material.  And the same pieces for the skirt as I cut on the lining, plus a piece 10.  But again, only going to cut what I need to of the skirt to determine where I need to take my corset pieces from and leave the rest of the skirt until later.


Here you can see each individual piece laid out carefully with
"right sides" up and in the order I need to sew them together


Taffeta doesn't really have a "right side/wrong side" to it.  But I'm a-type enough to want to keep track.  My thinking being that the "underside" of the fabric (the inside of the material when it's folded in half on the bolt) has been treated differently in processing, packaging and shipping than the "outer side" of the material which is exposed.  In case any slight variations exist that I can't see now, but may show as the fabric ages or is worn and then cleaned, I like to track the sides.  And since they look the same to me now, it takes some careful planning and purposeful intention with how I place my fabric now.  Hence the reason I unfolded and laid out the pieces, right side up as shown above.


For instance, piece 8 has not only match up arrows to be cut out of the sides, but also has match up circles on the interior of the piece.  They're best marked with a washable pencil on the "underside" (or wrong side) of the fabric so that in the course of sewing, they won't show on the garment.  I marked on the muslin with regular pencil without care about anything showing because ease saves time and the point of the muslin was to quickly assess pattern fit.


See the difference in how I cut notches into the edge for the arrows
on the pattern versus how I marked where the circles are


To Do List


  • Embroidery
    • communicate with mom
    • order pattern off internet
    • get supplies she needs
  • Begin The Real Thing assembly (cause need to get it off to mom in the mail!)
  • Browse/shop Michael's for beads and embellishments
  • Browse/shop for ribbon to lace up back - appropriate color and thickness

Wednesday, February 16, 2011

26 DTG-Getting Down to The Real Thing

My poor pattern pieces 4 and 7 have taken a lot of beating during the modifications I've made.  These are also the only two pieces that have different cutting lines for different sizes.  This hasn't been a problem thus far because I've been working off the largest size in the pattern.  Therefore, I didn't need to cut anything off the pattern.  But since my modifications, I'll need to cut the pieces to a size smaller than the largest.

I can handle this a few ways: a) cut the largest piece out then just trim the fabric down to the size I need on the edges that require modifications; b) cut through the pattern on the correct line for the size I need and either keep track of the paper piece by labeling it or immediately taping it back on; or c) making a copy of the piece at the size and with the modifications I need.

Normally, I choose b. For the integrity of the pattern, in case I change sizes or need to use the pattern again for someone else, I try to immediately tape the cut off piece back onto the pattern, in the correct place.  Trying to put pieces back on 5 years from now, when I may reuse it, is a pain and some of the cut offs are quite small and easily mistaken as scraps and thrown away.  More about this later when I cut out the skirt pieces from organdy.

But since I also have made modifications to 4 and 7 in addition to just needing to cut down to a smaller size, I've chosen to re-draw them.  This way I can extrapolate the seam allowance and mark the kick ins that I did on the lower section of these pieces before I even cut out the material.  It makes for cleaner, more uniform pieces (important for the lining and outer layers to match up well).


My newly made pieces in the middle, originals to the outside


Piece 4 - original on top, my copy on bottom
I use black marker to outline after I measure out my
extrapolations in pencil so it screams CUT ME HERE.


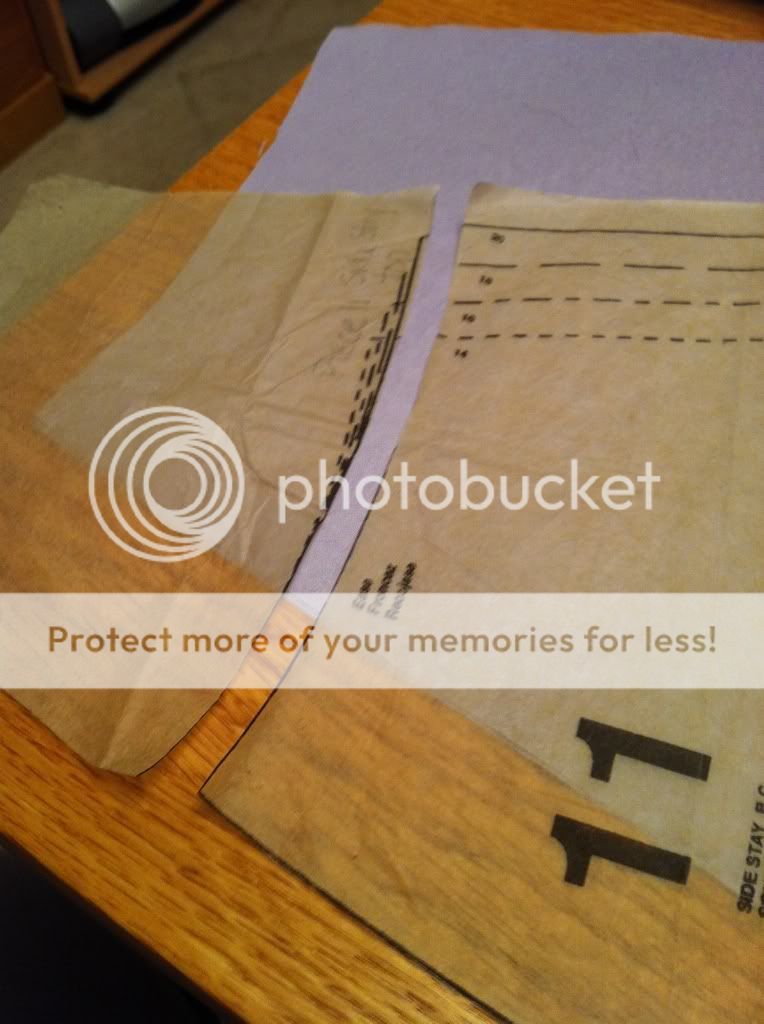
Piece 7 - Original on top, my copy on bottom
You can see the difference in the angulations I pulled in at the hip line

I talked earlier about how the pattern instructions give a map of how to lay out the pattern pieces to minimize material yardage, so you don't have to play with the pieces to fit them together in the most economical way.  They've already done it for you.  But in this case I have to be different.

Of course.

See, the material needed was given as separate measurements for the top (7/8 yd) and the skirt (8 1/4 yds), which is useful when you're making only one or the other, or in my case, modifying any layer of the pattern (like I'm doing with the skirt).  However, this can potentially waste a lot of material.  The skirt pieces are very wide at the bottom and thinner at the top (almost like a triangle), so when they are laid out on the material, there's a lot of unused space where the triangle is thinnest.  This is space where the top pieces could be taken out of, instead of all being put together on their own 7/8 yd of material.

So, to be most efficient, before I can cut the top pieces for The Real Thing, I need to do some work with the skirt pattern.

Pattern Work - Skirt

Remember long, long ago when I had separated my pattern pieces into piles - top, outside skirt layer, stay skirt layer?  Well, my skirt piles need a little additional work.  Because the bottom of the triangular pattern pieces are so wide, they generally don't fit on the standard length of tissue paper that the companies print the patterns on. So they put part of the triangle in one place and part of it in another on those sheets, and I have to tack them together.  So as I ironed the wrinkles out of my pieces, I assembled the extensions (bottoms) onto the skirt pieces.


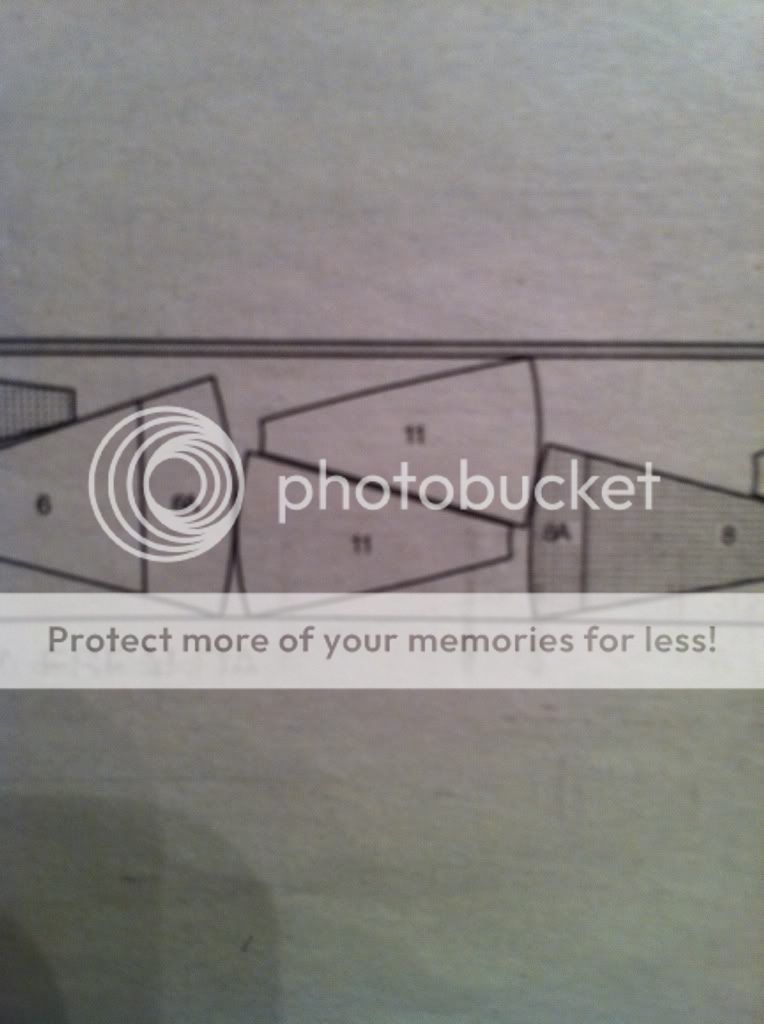
Pattern piece 8 (over the chair back) and it's extension prior to joining

Skirt (Garment B)
  Outer Layer - Organdy
  • 6 & 6A - Side front & extension
  • 7 - Front
  • 8 & 8A - Back & extension
  • 9 & 9A - Side back & extension
  Under Layer (Outer Layer of the Stay) - Taffeta
  • 10 - Waistband (only 1 cut from material, cut second one from interfacing)
  • 11 - Side stay (cut twice to equal 4 total pieces)
  • 12 - Front stay
  • 13 - Back stay
  Lining Layer (Under Layer of the Stay) - Lining
  • 11 - Side stay (cut twice to equal 4 total pieces)
  • 12 - Front stay
  • 13 - Back stay
Cutting Material

I start with the lining, spacing my skirt pieces well away from each other because I need to add length to it for a few reasons.  
  1. At 5-9, I'm taller than the average woman's pattern is made for
  2. I plan to wear heels with this gown, making me even taller
  3. I plan to make more of those billowed pull ups on my version compared to what the pattern calls for so that takes more yardage (NOTE: This should only affect the outermost organdy layer)
  4. Patterns tend to only allow for a 5/8" hem on the skirt.  For a full length gown, especially when using horse hair braid, I like to have a 1 1/2" hem.
  5. Since I have the material to spare, it never hurts to cut the pieces longer.  It does, however, hurt to cut them not-long-enough.  Why not be safer than sorrier?
I start with piece 12 because it needs to be on the fold as the front center.  This leaves plenty of room above it for corset pieces.  I need to cut each top piece twice, making 4 (or 2 in the case of the front center) of each piece because the pattern calls for an underlining and a lining.  I didn't do this for the mock-up because it was made from muslin, a type of cotton which already has a lot of body.  The more delicate formal fabrics need some help to add thickness and heft so a layer of lining is basted directly to the back of the taffeta, and the two layers are worked together as if they're one.  (For example, mom will embroider through both of these layers and then the lining layer will keep the back of the embroidery from contacting my skin.)


Skirt lining #12, top lining #2, #3, #4, #7, #6
Room left for second cutting of #2, #3, #6


Skirt lining #13, top lining #9
Room left for second cutting of #9

To Do List


  • Embroidery
    • communicate with mom 
    • order pattern off internet 
    • get supplies she needs
  • Continue laying out pattern pieces on lining and taffeta
  • Cut final top pieces from taffeta and lining
  • Begin The Real Thing assembly (cause need to get it off to mom in the mail!)
  • Browse/shop Michael's for beads and embellishments
  • Browse/shop for ribbon to lace up back - appropriate color and thickness

Monday, January 24, 2011

48 DTG-Mock Up & Mock Up, Take 2

Mock-Up


Mom's leaving in TWO days - yikes!  I need to get an appropriate, fitted size figured out for the top, so I can get my final pieces cut out of the taffeta.  I need to get these put together so I can layout what I want embroidered where and send the partly assembled top home with my mom for her to work them on her machine.


I'm also 2 different sizes on the pattern according to the large discrepancy between my bust and my waist/ribs, so I will need to blend from the largest point on one to the other, essentially making my own pattern pieces.  I start by ironing my tissue pattern pieces on a dry, synthetic setting.  Because they were so tightly folded, there are micro wrinkles that can make a difference in the fit lines if they are transferred to how I cut the material.  Especially on such an exact fitting garment, I want to eliminate possible discrepancies.


Top (Garment A) - 5 pieces
  • 1 - Side front
  • 2 - Front
  • 3 - Side back
  • 4 - Back
  • 5 - Back extension


Then I pinned my pieces to muslin.  Material comes already folded width wise and then wrapped onto the bolt.  So 60" wide fabric comes folded in half to be 30" wide and 45" wide is about 22".


60" lilac fabric is 30" on the bolt. The silver organza on top is 45" fabric (22" on bolt).


When cutting pieces, they are usually arranged on the instructions in a way to minimize how much yardage is needed. Most pieces require 2 of them to be cut from material, which is where the material bolts being folded in half comes in handy because this minimizes cutting.  Front center pieces need to be pinned with the center line on the fold line of the fabric so when the piece is opened it is symmetrical.


Front piece - The center line is at the bottom


Center piece unfolded
The pattern is "half" the material which was cut on the center fold.


It's important to lay pattern pieces out "with the grain" of the fabric so that seams match up, the garment lays well and forms where it's suppose to and so that the weave is all running in the same direction.  Differences on fabric with a pattern or a texture will show up!  Simply laying out the patterns the way the directions give is the easiest to ensure this.


Incorrect - the arrow on the pattern (grain line) should run parallel to the fold of the fabric


Correct! - Although this "angles" the pattern piece across the fabric, the grainline is now parallel to the fabric fold
I transfered all the markings from each pattern to the fabric.  The most important of these are the little inward arrows on the edge lines.  They provide the spots to make sure that the two pieces match up correctly.


All of my pieces cut out
I pinned the pieces together and sewed the seams at 5/8".  After 10 minutes getting myself into my spanx, the moment of truth: trying it on!


As I feared, this top is not as long as I'd like it to be.  Although I could add length to each piece where the pattern indicates, that point is at the waist line, so I would also need to add height from the fullest point of the bust.  Keep in mind the top and bottom edges are the raw material lines.  The finished product will actually be 5/8" shorter on the top and bottom for the seams.


In the back, the edges are appropriately spaced at the waist.  Once the edges are seamed, the pattern indicates there should be about a 2" gap where the laces would run (less depending upon how tightly I can get my friend to lace me into the thing at ball!).  But there is a much wider gap at the top in the back.  This isn't surprising since the front of the mock up has already indicated to me that this won't work for a full-figured bust without modifications.  Lastly, I don't feel like I'm getting a good exact fit at the rib cage either.  Grumph...


Mock-Up, Take 2


All of these conclusions led me to get out the Vogue pattern and make a mock up from it's top.  I mostly expected this, which is why I think I put off sewing for 2 days, wasting valuable time while my mom was here.  This and some psychological size issues, but we won't get into those.  Suffice it to say that my mom is leaving in the morning, and I'm 98% sure I won't have a completed top done to send home with her.  Thank God for the postal service and web chats.


I knew from the outset that this top would be easier to provide an exact fit because it is made up of more pieces.  More pieces means more seams which means more places to make adjustments to the curvature of my hips, ribs and Da Girls.  More seams also means more boning which is more support for Da Girls.  And I could already see that the pattern pieces are longer as I cut them out.  (The grainline pictures taken above are actually from the Vogue corset.  Compare those to the cut out pieces of the McCall's pattern below it and you can see the length differences.)


Top (Garment B) - 8 7 Pieces

  • 2 - Middle front
  • 3 - Side front
  • 4 - Side
  • 5 - Underflap - This piece will be eliminated, see next paragraph
  • 6 - Back
  • 7 - Side back
  • 8 - Back band
  • 9 - Front


The Vogue pattern calls for hook and eye closures across the front seam and lacing up through grommets on the back seam.  It was easy to modify the front to be one solid piece just by placing the center piece on the fold.  This also eliminates the need for pattern piece #5.  I also didn't like the severe dips of the sweetheart neckline in the Vogue pattern so I used the curve at the top of the McCall's pattern to cut the material.


You can see where I diverged from the severe sweetheart neckline
and modified this front piece to have a curve similar to the McCall's top


Once assembled, I was already much happier with the feel of this top!


Although it will need some finer details altered, I'm much more confident using the Vogue pattern for my top.


This side seam flares out a bit more than my natural curves,
but it will be easy enough to alter that seam on the final product
Just to be certain, I'm going to cut a second set of pieces of the Vogue pattern, sew them together and complete a few more steps of the pattern with these acting as a lining layer.


To Do List
  • Cut mock up lining of Vogue top
  • Assemble lining, add boning, and sew lining and outer layer together as pattern instructs
  • Proceed with enclosing the back edges of the mock up
  • Try on and fine tune!
  • Proceed with top from real material and lining